Variant Management
Overview Below is the comprehensive documentation for Variant Management.
- Author
Daniel
- Date
Nov 01, 2021
- Version
7.4.0
Introduction
For each ECU or Electrical Device there can be several different ECU Assembly of different Instance For each Domain there can be several Variant objects with different BOM s for each domain variant. For the Car/Vehicle , there will be different Variant s with different BOM s for each car type.
DRE: ECU Configuration for Assemblies
Configuring ECU Assemblies
Software Addresses
See the following links:
Right click to add an address if needed.
Name: Give the address a name that will be meaningful when choosing this address on the assemblies tab.
ID on Bus: This is ID of the device on the local bus. This can be found in the .dbc as the node ID, in the ldf and from the sharepoint map.
Bus Name: The name of the bus once the ECU can be flashed via UDS or DOIP or the version can be read. Until then, you can also put something obvious like JTAG.
Bus ID: Find the bus ID from the sharepoint doc.
ECU ID: This should be the BUSID followed by the ID on Bus. It should also be in the sharepoint doc.
UDS Request: This is should be in the .dbc or .ldf as the request and response messages if this can be flashed on CAN or LIN.
UDS Response: This is should be in the .dbc or .ldf as the request and response messages if this can be flashed on CAN or LIN.
HW Revisions
Revision: This should be the Revision of the PCB of hardware. Typically it will be A,B,C, but it is however you would identify the ECU HW.
P-Number: As soon as possible, your HW Revision should have an official part number.
EDCS: Enter the EDCS for wiring this part.
Note: For instanced ECUs (more than one per car), it is possible to have multiple rows with the same Revision and P-number but different EDCSs for the different car locations.
Software List Types
See Software List and Software List Type
Adding a software list Type.
Go to tab Softwares
Right click on window and hit “Add List Type”.
DRE: Creating or Editing ECU Assemblies
Configuring ECU Assemblies
Check the ECU Software Addresses HW Revisions and Software List Types.
Go to the ECU Assemblies tab.
Right click to add.
Fill in the following fields.
Name: Pick a name that describes the scope of the assembly.
Level: is not editable it should be ‘ecu.
Group: Pick the ECU from the drop down.
ECU Rev: Pick the HW Rev from the drop down.
Rev: Start at A. Change this whenever you modify the assembly.
PNumber: Once your assembly has a part number fill it in. (Blank is ok for now).
ECU Assembly Version Control
Note
Assembly version control is available with ECU Tracker version 6.0+, this feature supports Enable/Disable an assembly or Control usage by Version.
Go the Assemblies window, select the ECU Assembly you want to change.
Double click on
Enabled,Since VersionandEnd Versionfields to modify.See the example below:
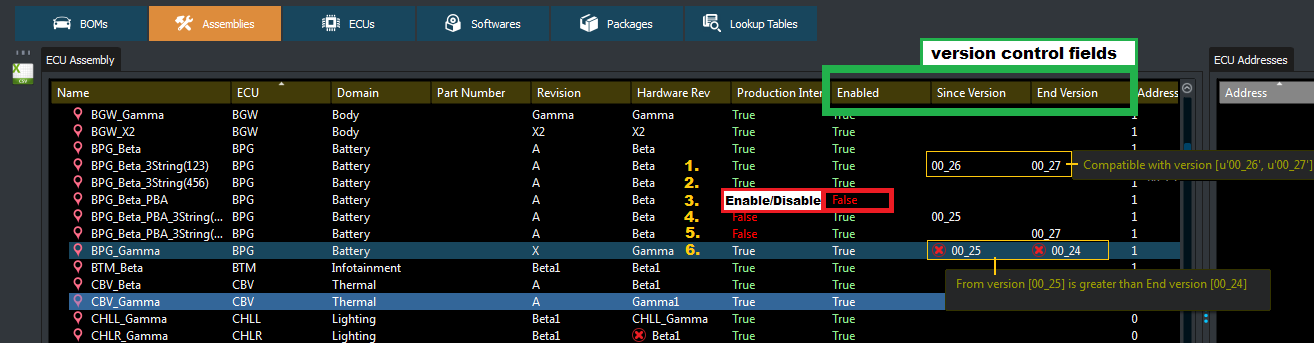
Case 1: Assembly will be used when building BPG package From version 00_26 to 00_27.
Case 2: Assembly will be used when building any BPG package.
Case 3: Assembly will be ignored when building any BPG package since Disabled.
Case 4: Assembly will be used when building BPG package For version 00_25 and above.
Case 5: Assembly will be used when building BPG package For version 00_27 and below.
Case 6: Error Case if the Since Version is higher than End Version build will failed.
Note
Enabled field check has a higher priority than Version Fields, which mean the Assembly will be ignored if Enabled=False regardless version settings.
Specifying Software List Types and Software Addresses
Go to Assemblies Tab.
Top Right Corner is Address and SW on Address.
Pick the Address from the drop down. Pick the SW list type form the drop down.
Specifying Hardware Revision
Go to the Assemblies tab.
Right click on HW Rev.
Select from the drop down.
Domain Owner/ Vehicle Owner: Adding / Editing Bill of Materials Objects
Adding a BOM object
Go to the BOMs page.
Right click to add another item.
Level: should be ‘domain’, or ‘car’
Group: If all variants for your Domain/ Car should be assembled in the same package, they should all have the same group which would be ‘beta_car’ for a car or the name of your domain for a domain variant. If in the future, Beta and Gamma packages are built separately, we would need 2 groups for each domain
Rev: Start at A. Change this whenever you modify the assembly.
PNumber: Once your domain variant, or vehicle variant has a part number fill it in. (Blank is ok for now).
Editing a BOM object Details
Go to the BOMs page.
Right click to edit the item.
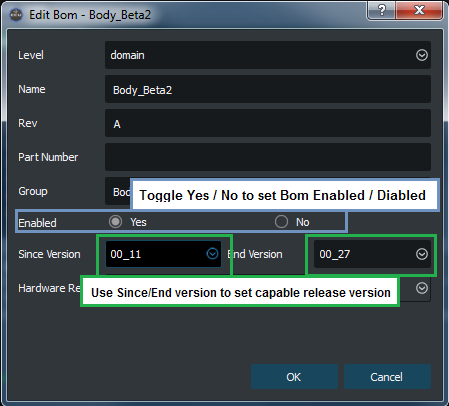
Bom Version Control
Note
Bom version control is available with ECU Tracker version 6.1+, this feature supports Enable/Disable an Domain/Vehicle level BOM or Control usage by Version.
Go to Bom window, right click on the Bom object you want to set, and select
Edit Bom.Configure the Enabled/Disabled by toggling the Yes/No in the
Enabledfield.Configure the Since Version and End Version by selecting the desired version from drop down.
Click
OKto apply change.
In the BOM window the color or Bom in under each list is based on the following:

Red: Bom is Disabled, will be exclude for all source group packages creation ignore the version range.
Yellow: Bom is only capable for source group package creation with version range limitation.
Default: Bom is capable for all source group packages creation.
Version and Enable setting are showed in the Bom detail widget.

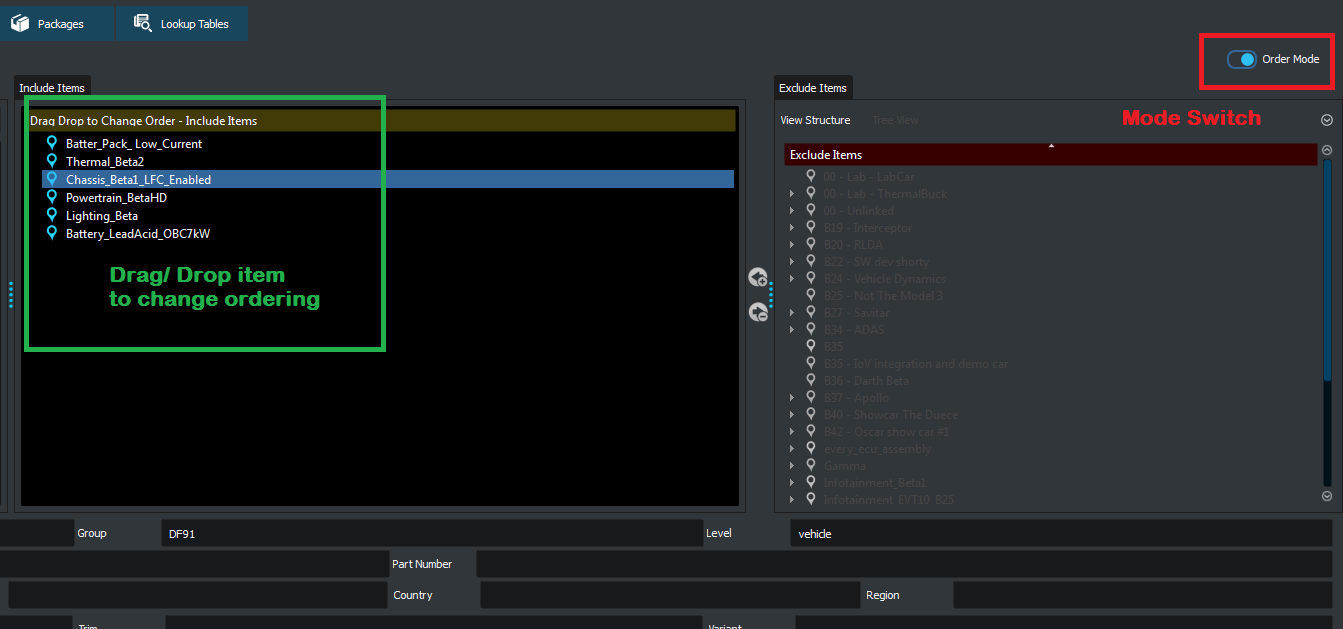
Adding items to the BOM
Select the BOM object that you want to modify (add items to) in the leftmost detail “BOM List”.
If editing a car, it is easy to find with Tree View. For Domains pick “Domain Level Only”.
Go to the rightmost tab “Exclude Items”.
Use Domain Level Only or ECU Level Only to find the items to add.
Select the item to add from the “Exclude Items”.
Click on the left arrow to add it.
It will move from the Exclude list to the Include List.
Sorting items included in the BOM
Select the BOM object that you want to modify the internal ordering.
Use the mode switch (View mode/ Order mode) on the upper-right conner of the ‘BOMs’ window.
Drag / Drop items in the ‘Drag Drop to Change Order’ list.
Clicked on other BOM or switch back to ‘View mode’ to save the modified order.
Removing items from the BOM
Select the BOM object that you want to modify (remove items from) in the leftmost detail “BOM List”.
If editing a car, it is easy to find with Tree View. For Domains pick “Domain Level Only”.
Find the item to remove from the “Include List”.
Click the right arrow to remove it.
It should no longer be in the “Include” list.
Video Tutorials
Configuring ECU Assemblies